The Plan of Work or “stages” was constructed by the Royal Institute for British Architects (RIBA). They’ve become the industry standard process for work in Architecture.
This is the most widely used standard for how architects work together with clients in the 21st century.
It’s not just British Architects who rely on the 8 phase design and construction plan. This systematized approach (or a variation of it) is practiced worldwide.
Refresh your RIBA knowledge with our ultimate break down of the Architecture Plan of Work.
Table of Contents
Download Our Full RIBA Plan of Work Stages Infographic! High-quality!
RIBA Phase 0 – Strategic Definition

One of the new additions to the 2013 Plan of Work is the first step of the cycle.
During the strategic definition, it is the supplier’s goal to properly consider the clients Business Case and Strategic Brief, before creating the Initial Project Brief in Phase 1.
A Business Case is the client’s rationale behind the initiation of a new building project.
This can be anything from a simple spoken request to a detailed written proposal, explaining what exactly they want from this project.
The architect is to thoroughly go through the wishes and intentions of the client before they can work on the Project Brief.
Together, they are able to properly define the scope of the project and go into the preparation process more prepared.
The business case often includes first cost evaluations and discussing the sites available for the project. This phase is particularly important in terms of sustainability, for example, if it would benefit a building to undergo refurbishment rather than be built new.
An example of a new refurbishment boom are first-tier cities in China.
There is no more land being released for development, driving the industry towards the refurbishment of older buildings instead.
Factors influencing this can be aspects like budget, local planning policies and building context.
Initial considerations of all team members for the projects are being considered, to create the best work force possible.
The Project Program is also being established.
This outlines the projected length of the project and how briefing, design and construction phases are going to be distributed in this time frame.
The only people involved at this stage are the client and the architect.
No information exchange with the government is necessary yet.
Summary RIBA Phase 0:
- Ensure the client’s Business Case and the Strategic Brief have been properly considered
- Establishment of Project Plan
- Consideration of Team Members
RIBA: Phase 1 Preparation and Brief (PB)
Client and Architect meet for the first time to understand the project.
The goal of RIBA Phase 1 Plan of Work: Preparation and Brief Understand the client’s needs and clarify the project.

The main goal of the preparation and brief of RIBA Phase 1 (not to get confused) is to produce the Project Initiation Document (PID)
The PID includes the Initial Project Brief and a Feasibility Report, as well as the Client Brief and Business Case from the previous phase.
The PID is what is being used to gain funding for feasibility studies.
This stage is important to ensure that the Concept design in Phase 2 can be as productive as possible.
RIBA 1.1 – Understand the clients’ needs
Before anything starts, architects need to find out what their client needs.
Architects will run through all kinds of questions aimed at establishing an initial vision for a project.
This is where clients and architects discuss matters surrounding
Architect Checklist for Client Needs in RIBA Phase 1:
- Size
- Location
- General scope
- Special requests (tech, security, advanced functionality, etc)
- Local authority and local architects
Sometimes site-visits before, during, and after completion are necessary per the architects’ request
RIBA 1.2 Architecture Contract Selection – different variations defined:
Projects can get complicated. What degree of involvement does the client want for the architect?
These are types of contracted work arrangements made in advance
Client Service Consultancy: (Full Control)
The architect does everything and commands control over the entire project and contractors.
- Organizes all sub-contractors
- Landscape design
- Exterior design
- Interior design
- MEP (Mechanical Engineering, and Plumbing)
Client Consultancy: (Full service)
The client does everything (hires all subcontractors) and the Architect is brought in as a contractor.
Architects are only responsible for the designs or an element of the project.
Split Consultancy: (A shared partnership of a project)
Architecture firm + Financial establishment/government/engineering company work as partners and split ownership of the project.
Split consultancy usually only happens in large scale new construction projects.
Sub-Consultancy: (Very specific)
An architecture firm is contracted to focus on one element of the project
Examples of an architecture firm sub-consultancy:
- Landscape architecture
- Interior design
- Drawings
- Design
- Muga (Multi-use game area)
- Individual room/area
The client chooses what role the architect will play in the project.
RIBA 1.3 Architecture Proposal is Created:

Architecture proposal checklist:
Architects write an outline and overview of the entire life-cycle of the project to submit to the client.
- Timeline outline: includes estimation on delivery elements
- Subcontractors: defined types of contractors needed (depending on the contract type)
- Scope of work: conditions of the build and the work expected to be delivered
- Team breakdown + past projects: all parts of the company and participants in the process
- Outline of expected build costs: design process, lawyer fees, labor, materials, etc)
- Lawyer Review: Layers look over the entire contract and update any questionable language
Summary of RIBA Stage 1: Preparation and Brief
- Creation of Initial Project Brief
- Creation of Feasibility Report
- Production of Product Initiation Document
- Assembling the Project Team
- Creation of Risk Assessment
Related Article: “100 Best Architecture Firms in the World (2020 Update)”
RIBA Phase 2: Concept Design (CD)
Architects take the needs of the clients and begin to produce concept drawings based on the needs of a client.
The goal of RIBA Phase 2, Concept Design is for architects to begin the production of concepts designs while incorporating the entire project and space around the project.
If the steps are followed correctly, then the Final Concept Design the inevitable result.

RIBA 2.1 – First draft of initial architecture design:
Dependent on clients needs, the Concept Draft Includes:
- Visual representation of the building
- Aesthetics
- Interior
- Exterior
- Landscapes
- Special requests
- 3 different visual concepts (architecture designs)
- Each can be similar or completely different
- Each can be similar or completely different

RIBA 2.2 – Design Meeting:
Taking the three architecture designs and narrowing the 3 designs to one concept.
The client and Architect meet to discuss more details prior to the hand in.
In many cases, the client will ask for a combination of elements from all three designs on the next iteration of drawings.
RIBA 2.3 Final Concept Design: Hand-in
1 design for the entire architecture project is produced.
Checklist for the first hand-in for a concept design according to RIBA’s Plan of the work process:
- General drawings
- Sketches
- Drawings
- Models (physical + 3D models)
- Very rough renders
- All relevant materials to express the design
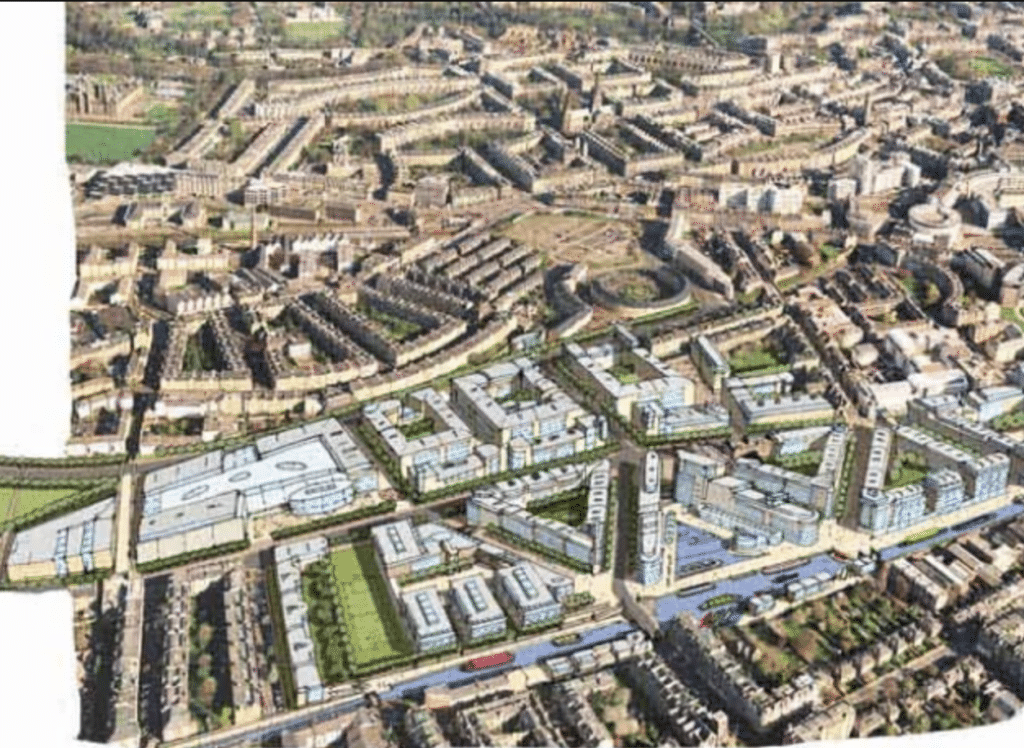
The drawings should be 1 to 50/500 (Adjustable to project needs).
Considerations during this stage include:
What is surrounding the project on the plot of land?
Examples of how the environment will affect the architecture design of a project:
- Busy highway
- River
- Terrain
- Landmarks
- Historical sites
- Natural Habitats
- Parking lots
- Foot traffic
- Surrounding buildings
- Noise
- Road access
RIBA 2.4 The “Hand In”:
Architecture hand-ins are the delivery of work in stages. This allows for an iterative approach to the design process.
Architecture hand-in checklist:
- General architecture plans
- Sections
- Elevations
- All relevant material to express the design
- Drawings scale of 1 to 100/200
- Design Concept Checklist
All drawings that help visualize and allow the client to understand how the final project will look.
There can and will be multiple hand-ins.
Examples of elements within architecture hand-ins:
- Partial work
- Sketches
- Meeting notes
- Picking up from old drawings
- Numerous edits
RIBA Concept Design Checklist: General plans and sections
- Plans
- Sections
- Elevations
- Renders
- Axonometrics
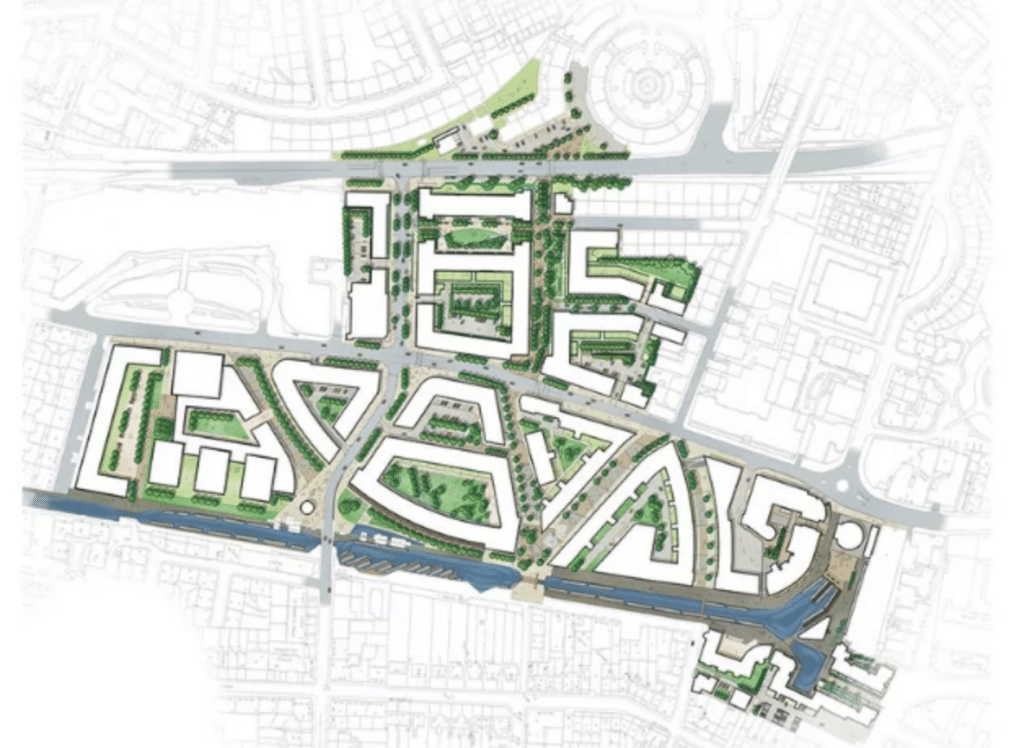
- Situation Plan
- Physical Models
The architecture concept design tells you how your designs fit into the surroundings.
Examples of the information found in Architecture concept designs include:
- Square meters
- Walls
- Size of plot
- Relation of what is indoor and outdoor.
These architecture concept designs are the deliverable usually on a scale 1 to 200 (Adjustable to project needs)

1) Plans:
- Tells you how your designs to the surroundings
- Provides other information such as square meters, walls, size of the plot, the relation of what is indoor and outdoor.
- Think of this stage as “Blue Prints”

2) Sections:
- Provide you with the vertical elements of the building
- Gives you a good idea of how your design and your building relates to other buildings height-wise
- Depictions of a cut apart or half a building
3) Elevations:
- Provide the vertical visual aesthetic of your design
- It’s the exterior shell, the view from the outside

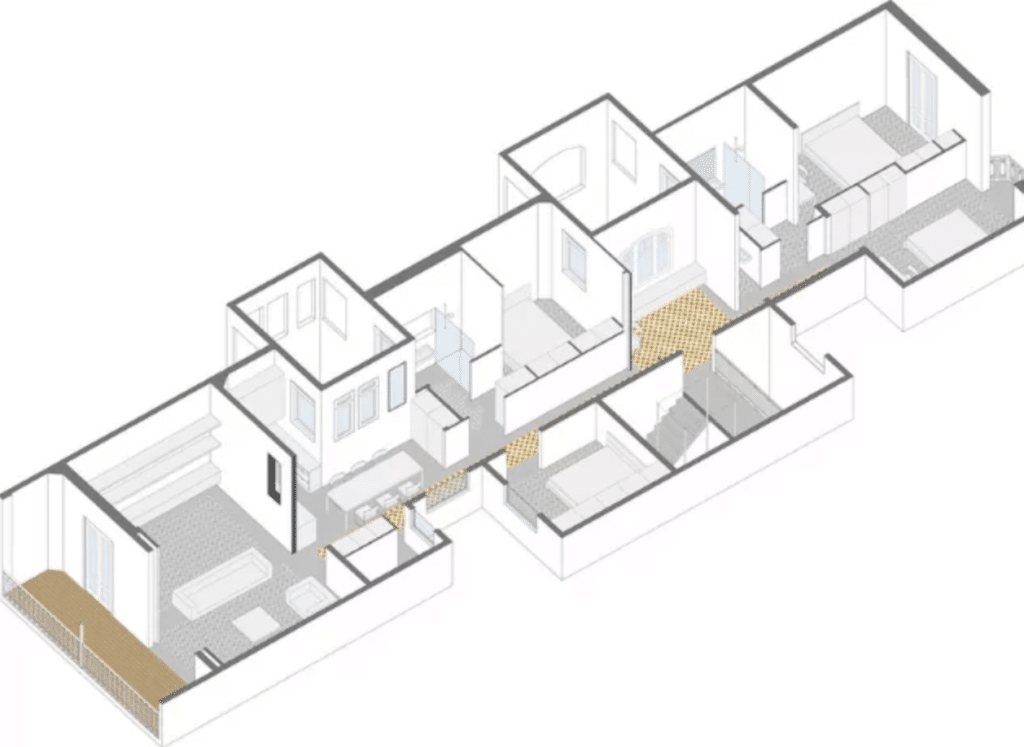
4) Axonometrics
- Technical 3D View of the design for the entire building
- Visualization of a plan
- The “sims” view (remember the computer game?)
5) Renders
Future drawing (the design in the context of what it would look like once it’s built)
Architects Deliver 3D mockups usually include:
- The exterior of the building
- The interior of the project
- The landscape and surroundings

6) Situation Plan:
A delivered architecture situation plan provides the client with the vertical elements of the building.
A situation plan in architecture gives you a good idea of how your design fits in space around it and the building as it relates to other buildings height-wise.
- What’s around it (access to it)
- 1 to 1500 to 1 to 5,000 (Adjustable to project needs)
- View from above showing the land around it

7) Realistic Renders of Architecture Interior and Exterior Renders Checklist:
Interior and exterior architecture renters help clients visualize future space in more detail.
Photo-like mockups of inside, outside, and the building in its location.

8) Physical models
Helps demonstrate the final product in a more tangible way. Can be any size.
Architecture physical models help the client better visualize the final delivery.
3D Physical models are usually made by hand but there are plenty of architecture firms exploring 3D printing and other solutions.

Architecture Project Permits and Permissions Checklist:
- Consider the historical significance of the site (world heritage)
- Government-issued building programme (permit)
- Water, land (brown and urbanized)
- Height (air rights)
This phase is crucial to helping the client better understand the architect’s vision for the future.
Summary of RIBA Stage 2: Concept Design
- Produce Initial Concept Design
- A client decides on Final Concept Design
- Creation of visualization of Project Brief
- Plans
- Sections
- Elevations
- Axonometrics
- Renders
- Creation of Elemental Cost plan
RIBA Phase 3: Schematic Design (SD)
The Goal of RIBA Phase 3 Schematic Design is to provide a more detailed perspective and apply the materials to the project.
If the architect can work with the client to agree on the materials for a project, they can create a cost plan.

RIBA 3.1 Reiteration and further development of phase 2:
RIBA 3.2 Adding Concept Details:
Concept details are fine details of an architecture design project.
It gives any project all the small visual accents and unique aesthetic identity. Finally, the client checks off the architect’s final drawings.
Before the final design can be approved, the architect must work closely with the client through the following the fine details of a concept design.
Examples of architecture concept details:
1) Building System Services:
- Window, door, exit, fire escapes, stairway locations
- Wall patterns
- Materials
- Some electrical
- Fittings, fixtures, equipment
- Environmental and cleanup fees/charges
- Atmospheric conditions (Mood boards/Material boards – e.g. concrete and wood, glass and tiles, etc)
- Load bearing mechanical (structural logic of the building – e.g. foundation, pillars, and load-bearing walls)
- Aesthetics from the interior, exterior, and landscapes
- The scale is 1 to 20/50 (Adjustable to project needs)
What additional systems are needed for this design project?
- Tech, security, advanced functionality
- Mechanical, Plumbing, Electrical (MPE)
- Green/eco/solar
2) Structure of the Building – Type Selection
What type of building materials will be used in this project?
- Concrete (prefab + in situ)
- Masonry (brick + mortar)
- Steel (i beams + cladding – multiple types)
3) Cost Plan:
The estimated cost of build dependent on the chosen materials (labour not included)
**By this stage, the design has been firmed up but changes can and do occur.
Checklist of Things Architects MUST Avoid getting the closest estimate possible:
- Forgetting to check-in with authorities
- Lack of transparency
- Not using an estimating checklist
- Oversimplifying Labour costs
- Ignoring weaknesses
- Lack of risk estimation
- Number or calculation errors
RIBA Phase 3 is usually when the planning application is being submitted to the responsible authorities.
The detailed drawings and reports are to be included in the application.
A planning application can include:
- A standard application form
- Location plan, showing the site and context
- Site plan or block plan, showing the proposal in greater detail
- An ownership certificate
- Agricultural holdings certificate
- Application fee
Further factors depend on the location and scale of the project.
Summary of RIBA Phase 3: Schematic Design
- Final Design approved
- Submission of Planning Application
- Cost plan finished (Labour excluded)
- Creation of detailed CAD models
Related Article: “25 Best Architecture TED Talks”
RIBA Phase 4: Detailed Design (DD)
The Goal of Riba Stage 4 plan of work is to prepare the detailed technical designs for the building.
RIBA Stage 4 detailed designs checklist:
- All architectural contractors
- Previous designs and notes
- Structural information
- Building services information
- Any design for specialist subcontractors and specifications
All designs are to align with the Design program and Design Responsibility Matrix.

RIBA 4.1 – Detailed Drawing Produced:
Lead Architect and Construction Architect produces a detailed drawing of the design

RIBA Phase 4 Details: The architecture drawings will include
- Electrical outputs
- Doorways
- Insulation
- Exit sign locations
- Many other specifics.
Depending on the project, all needed engineers are subcontracted and work alongside the Lead and Construction architects.
At this stage, the overall design of the building does not change.
- Engineers are contracted (dependant on the project)
- Construction architects join the architect team
- No design changes are necessary
- Design and Architectural teams hands off the project to the project manager
- The detailed drawing production process continues with Construction Architect
- Details are 1 to 1 up to 1 to 20 (Adjustable to project needs)
If needed engineers will work alongside the lead architects and construction architects
Information for statutory standards is made available and construction safety checks
Regular check-ins with local authorities.
RIBA 4.2 Tender:
This RIBA stage uses the information provided from the detail design phase.
If the supplier has already been chosen it is their responsibility to create their own supply chain.
For this, they have to prepare tender documentation and their own version of the employer’s information requirements.
- All documents are ready to acquire relevant contractors to execute the build
- Review quotes and pricing from contractors
- Selection of contractors (team)
RIBA 4.3 Contractors:
Contractors are reviewed, chosen, approved, and contracted out.
All contractors are reviews, new ones are chosen, approved and contracted out.
All elements are assigned.
There is no question as to who is responsible for appointing all subcontractors depends on the original contract between The Architect and Client.
The Lead architect and Project manager approve all selections of contractors.
- Architects review and approve selections
- Discuss with the client for approval.
- The client agrees and signs off on contractors
The design team is expected to work on their part individually, according to the designs set out in the previous stages.
It is possible that the design team has to respond to queries that arise during the construction phase.
Once the detailed designs are finished the Architects hand it over to the Project Manager.
Again, it’s important for the architects to regularly check in with the authorities during this phase.
Summary of RIBA Stage 4: Detailed Design
- Preparation of detailed drawings
- Designs by specialists subcontractors
- Construction Architects join the team
- Preparation of tender documentation
- All contractors approved by Project managers and client
RIBA Phase 5: Construction to Build (CB)
The goal of RIBA Phase 5 is to construct and build the project.

RIBA 5.1 Construction and building:
This is the execution of the building phase.
Architect and the site foreman oversee the execution of the design (the contractors are doing the job correctly)
Followed up by the inhouse architect to carry out quality and control and design control
RIBA 5.2 Health and Safety:
Local inspectors review and observe the site to make sure all health and safety laws are being followed
Avoiding fines and any major violations prior to finalization is a major step.
Inspectors go through a rigorous check of the building and operations to be sure it’s ready for use.
Summary RIBA Stage 5:
- The Construction onsite
- Manufacturing offsite
- Processing Design Queries
- Contract Administration Service
- Issuing Final Certificate
RIBA Phase 6: Handover Closeout (CHo)
The goal of RIBA Phase 6 is the handover of the completed building and the conclusion of the building contract.
The client is now able to occupy the building.
For 6 to 12 months, also called Defect Liability Period, the contractor is still responsible for any defects on the property.

RIBA 6.1 Report:
Project summary after the building process is complete.
At the end of construction, a report is produced covering:
- The contractors
- Errors
- Accidents
- Incidents of waste/loss, etc.
This report serves as a learning document for future work of the architect.
RIBA 6.2 Inauguration and official opening:

Site visit by clients and stakeholders. All relevant parties are invited
This is the fun part. Red ribbons and champagne to celebrate the completion of a project.
Summary of RIBA Stage 6: Construction to Build
- Completion of construction
- Hand over to the client
- Issuing of the final report
- Start of Defect Liability Period
- Champagne
Related Article: “30+ Winning Proposals – Architecture Design Winners”
RIBA Phase 7 – In Use
This is the second new addition to the RIBA’s Plan of Work 2013.
The aim of RIBA Stage 7, “in use” is to provide an aftercare service to the client and the building.
The goal of RIBA Phase 7 is to ensure the continued maintenance and integrity of the project after completion.
Examples of the services provided to the client after building completion:
- Advice on Maintenance
- Energy certificates or consumption
- Letting or tenants queries
- General
- management of facilities
- Insurance
- Tenants queries
- Facilities management
- The preparation of tender documents for maintenance and operation contracts
Sometimes it’s necessary to pass on expert knowledge in order for the building to be used properly.
This especially applies when it comes to sustainability.
The ‘end of life’ of a building can be part of Phase 7 or considered part of Phase 0 of a new construction cycle.
In this case, it’s considered whether the development can be reused by refurbishing it or has to be demolished.
This stage is what united the phases of the plan into a cycle of development.
Summary of RIBA Stage 7: In Use
- Aftercare service for the client
- Advice on the ideal use of property
- Sustainability
- Consideration of end of life
Download our full infographic on the RIBA Plan of Work! High-quality for FREE!
RIBA Plan of Work Concluded
The Plan of Work is recognised internationally as the standard procedure.
While no one is expected to use it, by doing so you can play it safe.
“Unless they are inappropriate, use the RIBA forms of Appointment” – A Guide to Keeping out of Trouble.
The guide allows to simplify the project to both architects and the clients, and increases the communication between both parties.
Need help getting started?
We worked through the red tape and bureaucracy so you don’t have to.
In most cases, you must complete some official forms for the Building and Residency Register (BBR forms) together with the building application for the municipality.
Visit your municipality’s website and find the correct forms to be filled in.
Here, and at BBR.dk , you can also read more about the review and application for construction work.
- Are you looking for existing building drawings?
- Local authority contact?
- Not sure what you can or cannot build? See the restriction here.
- Building regulations to consider?
- Help with your Cost estimate?
Download our full RIBA Plan of Work infographic! High-quality!
Get started on RIBA Plan of work with the right tools and process in place!
Explore our list of 140+ architect tools that can make your work easier and save a bunch of time!
What do you think about the RIBA Plan of Work 2013? Share your experience and thoughts, send us a message!





Thanks for sharing this information! So useful. I have also read an article on the same subject here, with some good points too
Thank you for the good descriptions about RIBA standard.